Introduction
eG Enterprise is a Monitoring Solution that gives you a complete overview in a single pane of glass about your application performance and infrastructure. Automatic correlation and guided drill down to the related components helps you to identify the root cause. Monitoring the User Experience is one of the greatest benefits, to identify and analyse issues in a pro-active way.
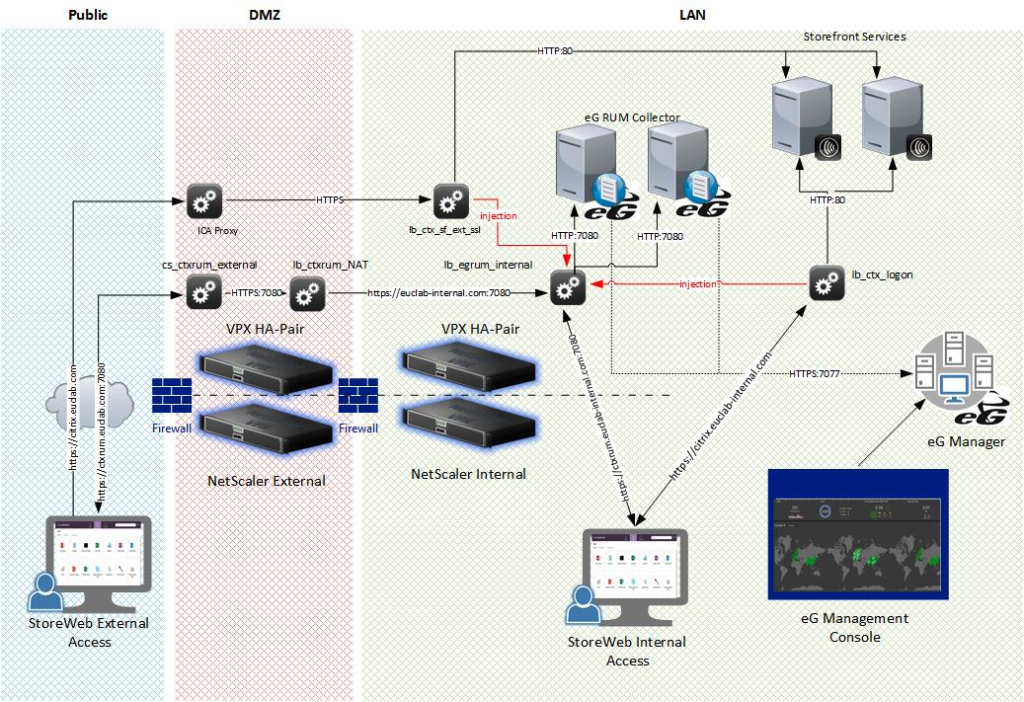
This Blogpost will show the setup to monitor the Citrix StoreFront User Experience with eG Real User Monitoring (eG RUM) and Citrix ADC. This will work with the StoreWeb only, not with native Store. eG RUM supports Java, .Net, and PHP. Any webpage/web-application containing HTML content, where JavaScript code can be included in the <head> tag, can be monitored, this is comparable to how Google Analytics would work and works for nearly any type of website, including major SaaS solutions like SharePoint Online or Salesforce
eG Real User Monitoring (eG RUM)

To Monitor the User Experience from an eG perspective you don’t need a local agent on the users endpoint, eG focuses completely on the backend stack and uses a javascript component (profiler) to capture measurements directly from the browser on the endpoint. The measurements include; the request time that is needed to transfer the data from the endpoint to the web application server, the time spend on the backend and the response time back to the client as well.
The following screen will show how the metrics are transfered from the endpoint to the eg Manager
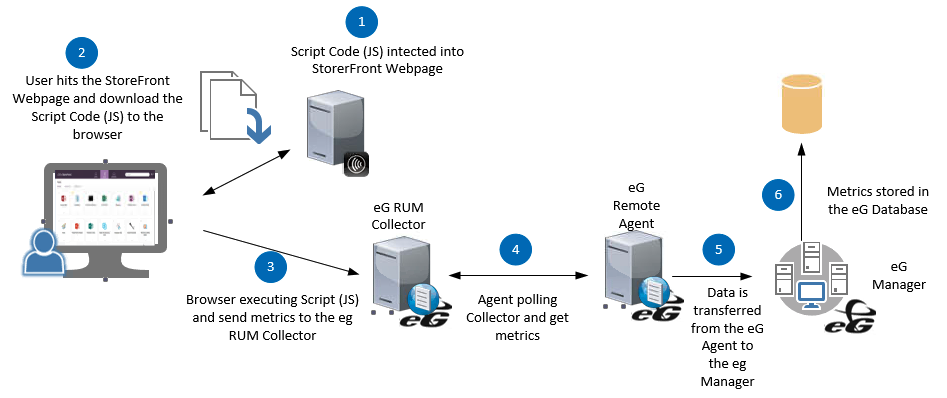
In this scenario I’m using 2 eG RUM Collectors they are Loadbalanced through Citrix ADC as well. The eG javascript file, that’s being called from the code injection in the <head> is in this scenario hosted on the RUM Collector. If the Javascript file is not available this could potentially add additional latency to the web application. The Javascript file could also be hosted on the Web Application server (in this case StoreFront) as well. A good starting point that I recommended is the eG RUM FAQ, where you can find the most answers.
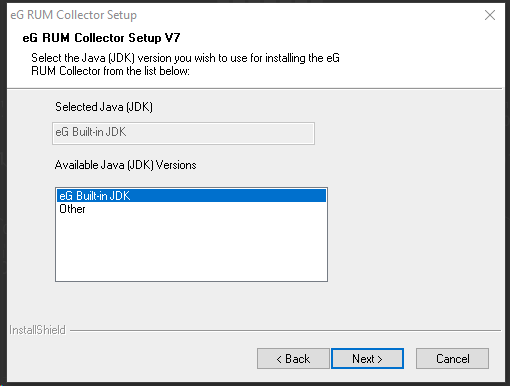
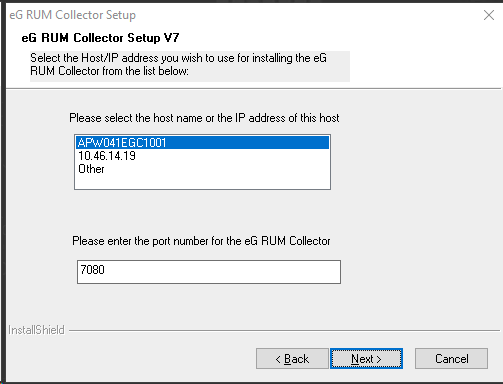
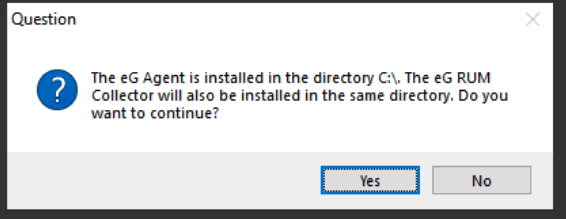
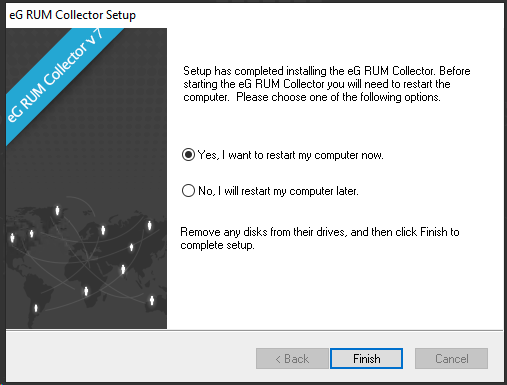
RUM Collector setup
First, staring with the Installation of the 2 RUM Collector, running on 2 virtual Server 2019 with 2 vCPU and 8 GB RAM each.


Citrix ADC LoadBalancing for RUM Collectors
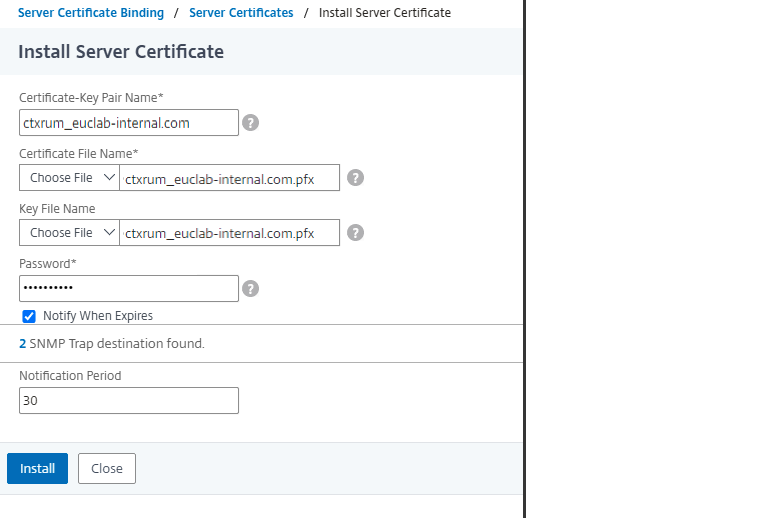
For the internal eG RUM Collector LoadBalancer you need an certificate from to bind it to the Loadbalancer, and face the it with SSL, the backend communciation from the LoadBalancer to the eG RUM Collectors will use http only.
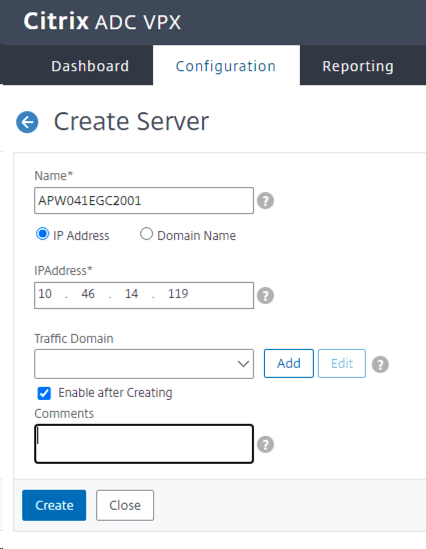
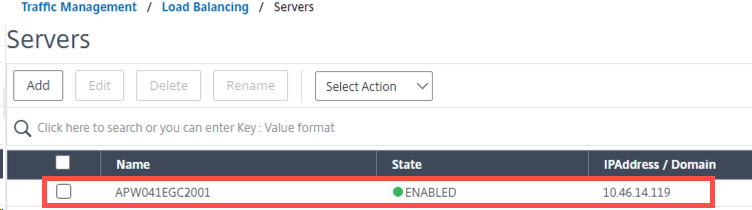
Serverobject
Create 2 Serverobjects for both RUM Collectors with their name and IP Address
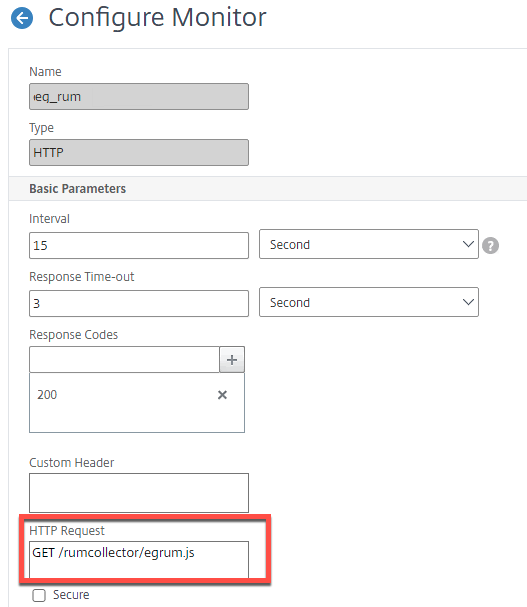
Monitor Configuration
| Value | Data |
| Name | eg_rum |
| Type | HTTP |
| Interval | 15 seconds |
| Response Time-Out | 3 seconds |
| Response Code | 200 |
| HTTP Request | GET /rumcollector/egrum.js |
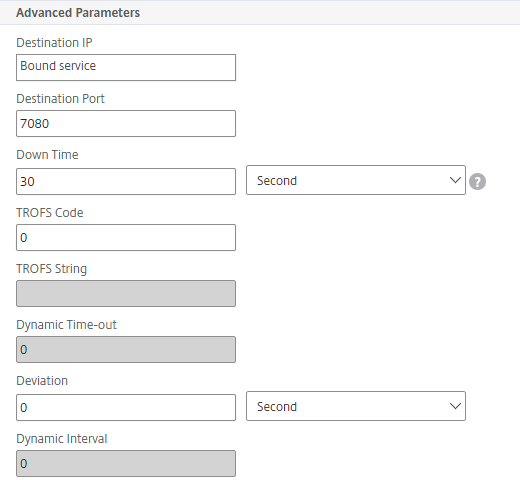
| Destination IP | Bound service |
| Destination Port | 7080 |
| Down Time | 30 seconds |
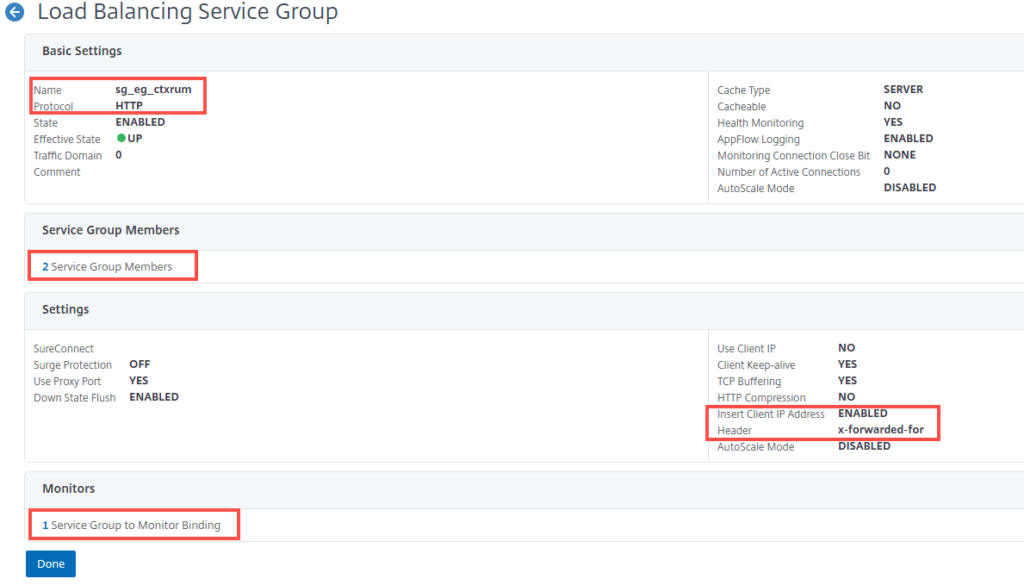
Service Group
| Value | Data |
| Name | sg_eg_ctxrum |
| Protocoll | HTTP |
| Insert Client IP Address | ENABLED |
| Header | x-forwarder-for |
| Service Group Members | add previous 2 RUM Collector Serverobjects |
| Monitors | add previous created monitor, e.g. eg_rum |
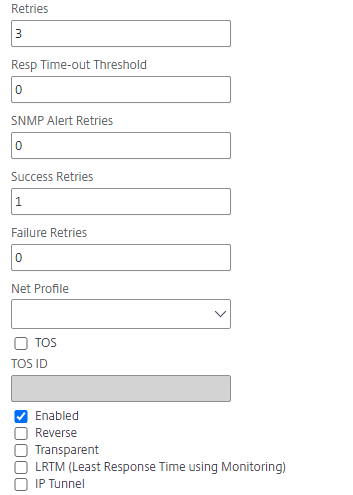
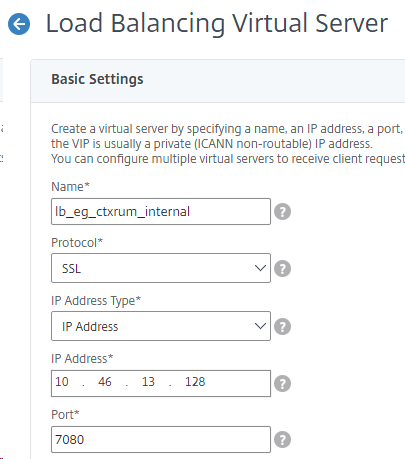
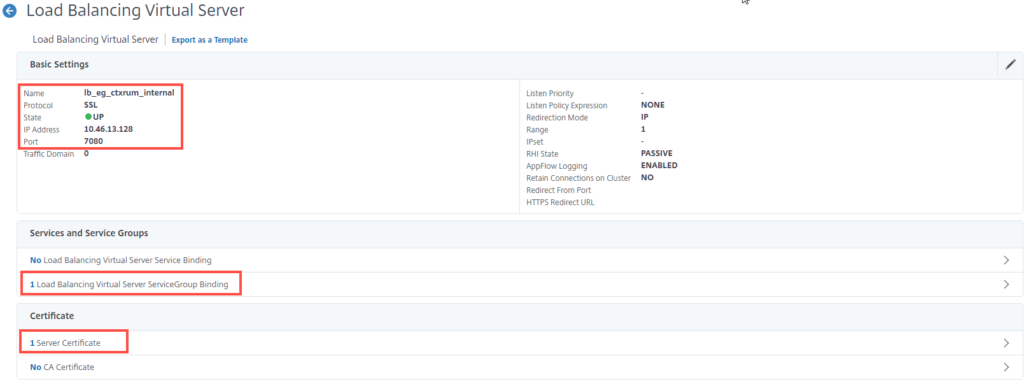
Load Balancing Virtual Server
| Value | Data |
| Name | lb_eg_cxrum_internal |
| Protocol | SSL |
| IP Address Type | IP Address |
| IP Address | <enter the LB IP Address> |
| Port | 7080 |
| LB Virtual Server ServiceGroup Binding | choose the previous created Service Group, e.g. sg_eg_ctxrum |
| Server Certificate | Install and Bind a Server Certificate, e.g. ctxrum.eucweb-internal.com |
| Persistence | No configuration required |
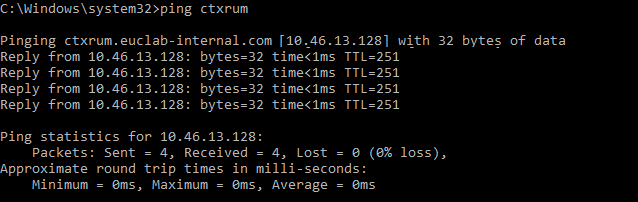
Create a DNS Record for the LB Server IP Address with the name, e.g. ctxrum, and test if it’s reachable.
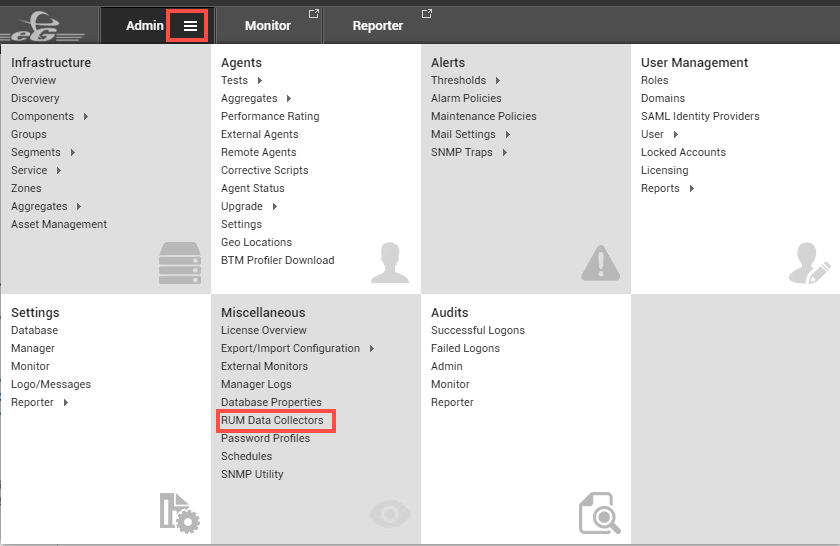
RUM Data Collector Configuration

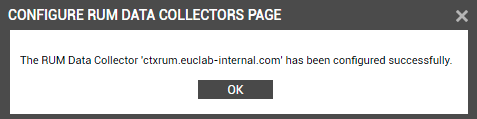
Add RUM Collector
| Value | Data |
| Nick Name | ctxrum.euclab-internal.com |
| Public URL | https://ctxrum.euclab-internal.com:7080 |
| Private URL (Optional) | https://ctxrum.euclab-internal.com:7080 |


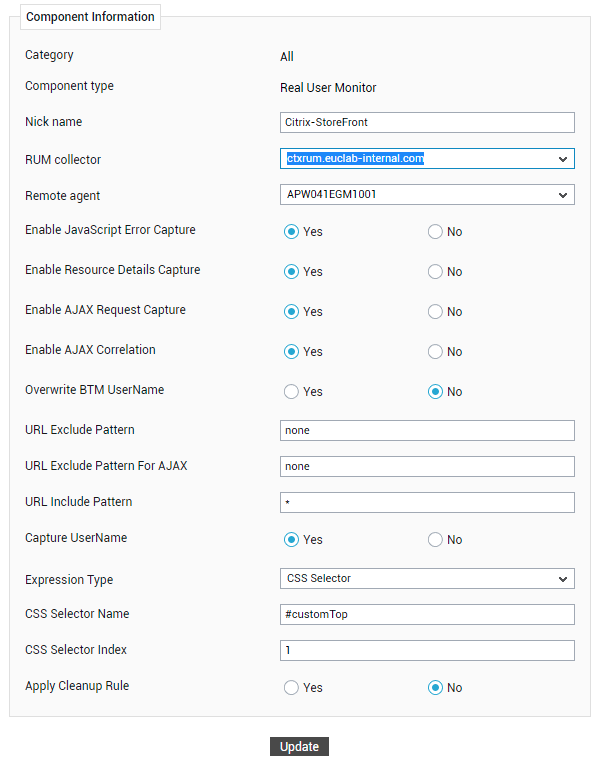
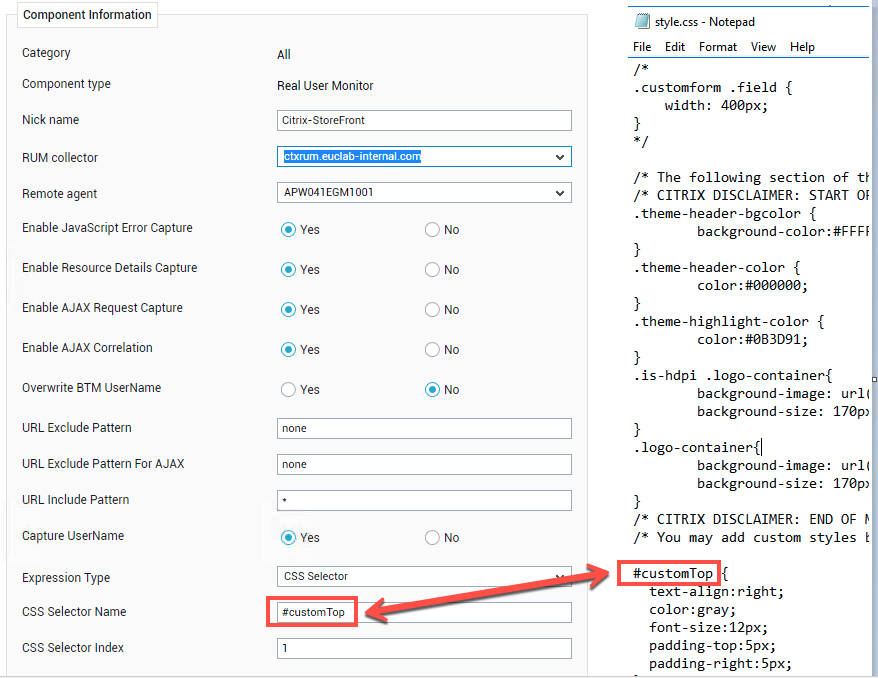
Add RUM Component

| Value | Data |
| Category | All |
| Component Type | Real User Monitor |
| Nick Name | Citrix-StoreFront |
| RUM Collector | ctxrum.euclab-internal.com |
| Remote Agent | <Choose en exiting Remote Agent> to transfer the Date, in my scenario I’m using the eG Manager as the Remote Agent |
| Enable JavaScript Error Capturre | Yes |
| Enable Ressource Details Capture | Yes |
| Enable AJAX Request Capture | Yes |
| Enable AJAX Correlation | YES |
| Overwrite BTM Username | No |
| URL Exclude Pattern | non |
| URL Exclude Pattern For AJAX | non |
| URL include Pattern | * |
| Capture Username | YES Note: This requires a StoreFront modification |
| Expression Type | CSS Selector |
| SCC Selector Index | #customTop |
| CSS Selector Index | 1 |
| Apply Cleanup Rule | No |
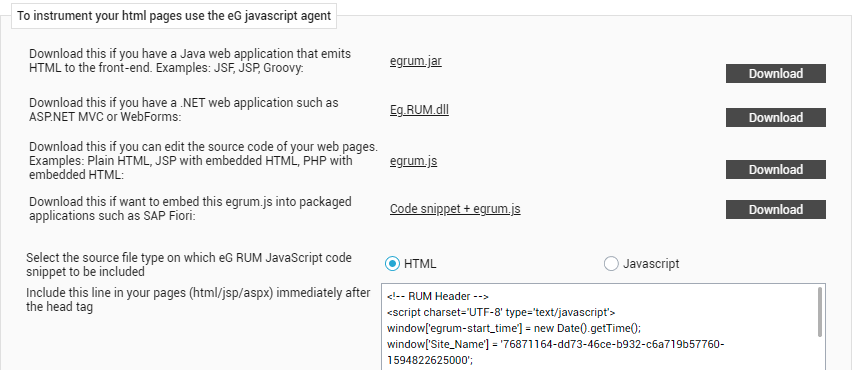
In the lower section you can find the RUM Header, copy it to a notepad file for later usage in Citrix ADC configuration

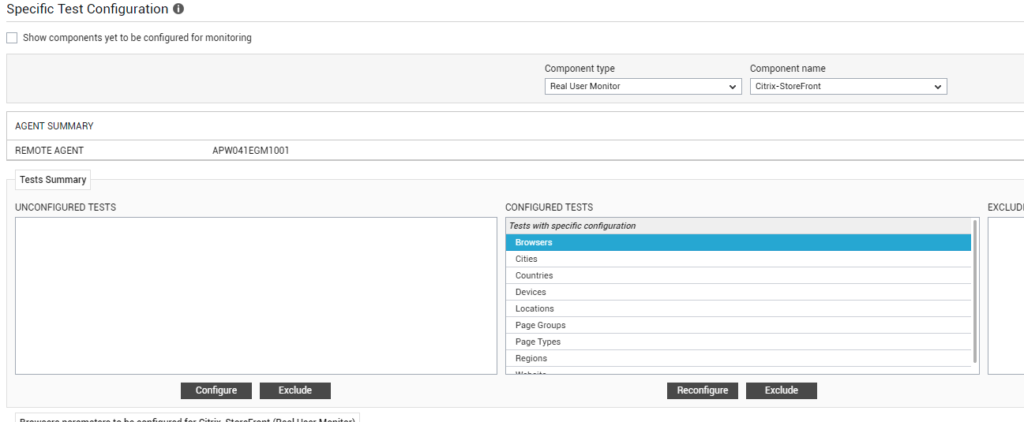
Specific Test Configuration
I’m using the following Parameters for all tests
| Value | Data |
| Test Period | 5 mins |
| PROXYHOST | none |
| PROXYPORT | none |
| PROXYUSERNAME | none |
| PROXYPASSWORD | none |
| CONFIRM PASSWORD | none |
| Do YOU WANT TO LIMIT THE PAGE VIEWS | No |
| CONSIDER JAVASCRIPT ERRORS IN APDEX CALCULATIONS | Yes |
| URL SEGMENTS TO BE USED AS GROUPED URL | 1,2 |
| URL PATTERNS TO BE IGNORED FROM MONITORING | *.js,*.css,*.jpeg,*.jpg,*.png |
| JAVA SCRIPT ERRORS TO BE IGNORED | None |
| INCLUDE PAGETYPE CATEGORIZATION IN TPOP DD | No |
| MAXIMUM HEALTHY TRANSACTION IN DD | 5 |
| MAXIMUM SLOW TRANSACTION IN DD | 5 |
| MAXIMUM ERROR TRANSACTION IN DD | 5 |
| SLOW TOLERATING CUTOFF (MS) | 4000 |
| TOLERATING CUTOFF | 16000 |
| PAGELOADTIME CUTOFF | 3600000 |
| PAGE TYPES TO BE INCLUDED IN DASHBOARD | Ajax iFrame Virtual Page |
| SEND ZERO VALUES WHEN THERE IS NO TRAFFIC | No |
| DD FREQUENCY | 1:1 |
| DETAIL DIAGNOSIS | On |
Inject the JavaScript Code into Citrix StoreFront
Citrix StoreFront is Loadbalanced through Citrix ADC, create a rewrite Action and Policy first -> AppExpert -> Rewrite -> Actions
Rewrite Action
| Value | Data |
| Name | rewact_eg_RUM |
| Type | REPLACE_ALL |
| Expression to choose target location | HTTP.RES.BODY(10000000) |
| Expression | See information below |
| Search | Text </head> |
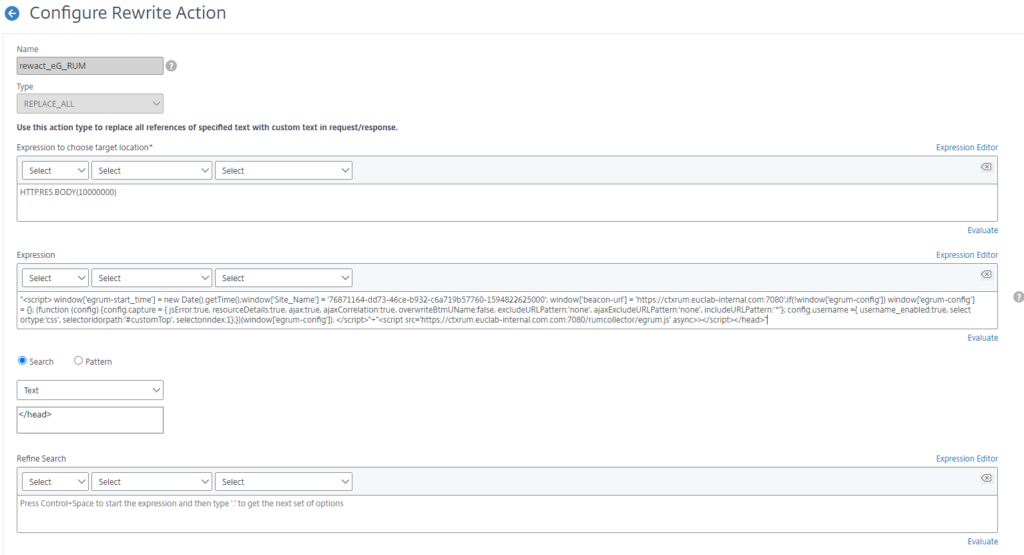
Expression
For the expression the RUM Component Header Script Code must be copied, but it’s need to be modified
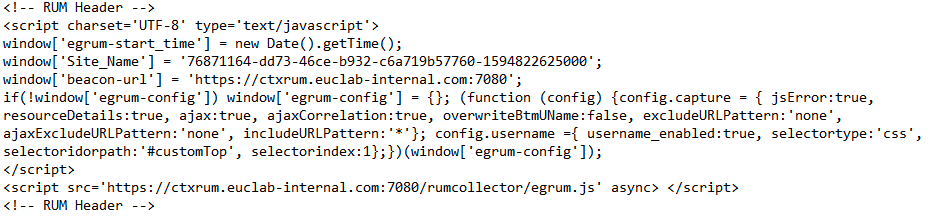
Change it as follows:
You can replace the Site_Name GUID 76871164-dd73-46ce-b932-c6a719b57760-159482262500 and beacon url https://ctxrum.euclab-internal.com:7080 with your data and insert it in the expression of the action
"<script> window['egrum-start_time'] = new Date().getTime();window['Site_Name'] = '76871164-dd73-46ce-b932-c6a719b57760-1594822625000'; window['beacon-url'] = 'https://ctxrum.euclab-internal.com:7080';if(!window['egrum-config']) window['egrum-config'] = {}; (function (config) {config.capture = { jsError:true, resourceDetails:true, ajax:true, ajaxCorrelation:true, overwriteBtmUName:false, excludeURLPattern:'none', ajaxExcludeURLPattern:'none', includeURLPattern:'*'}; config.username ={ username_enabled:true, selectortype:'css', selectoridorpath:'#customTop', selectorindex:1};})(window['egrum-config']); </script>"+"<script src='https://ctxrum.euclab-internal.com.com:7080/rumcollector/egrum.js' async>></script></head>"Rewrite Policy
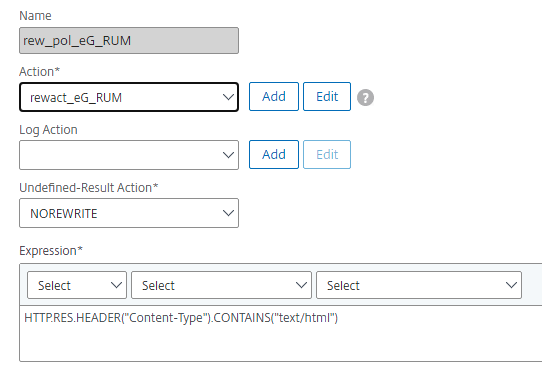
AppExpert -> Rewrite -> Policies
| Value | Data |
| Name | rew_pol_eg_RUM |
| Action | rewact_eg_RUM |
| Undefined-Result Action | NOREWRITE |
| Expression | HTTP.RES.HEADER(“Content-Type”).CONTAINS(“text/html”) |
Citrix StoreFront LoadBalancer
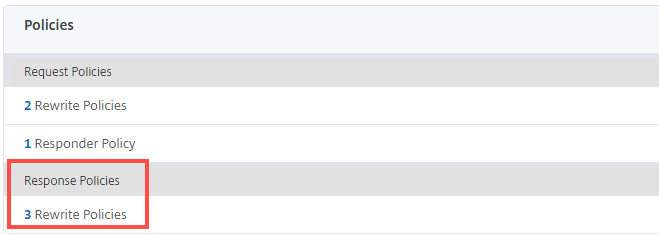
Configure the existing StoreFront LoadBalancer with an additional Response Policy

Citrix StoreFront Modification
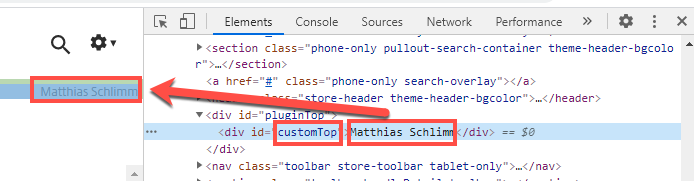
To capture the Username in the Webpage of Citrix StoreFront and show it in the metric data in the eG Manager, Citrix StoreWeb must be modified. If you monitor another website, please check if the Username is visible in the Webpage or how you can show and collect it with eG.

Script.js Modification
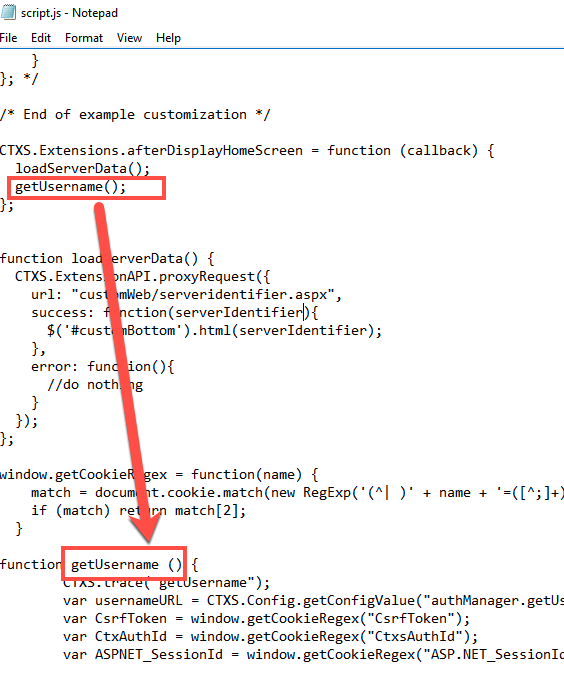
Open C:\inetpub\wwwroot\Citrix\StoreWeb\custom\script.js and add the following function.
function getUsername () {
	CTXS.trace("getUsername");
	var usernameURL = CTXS.Config.getConfigValue("authManager.getUsernameURL");
	var CsrfToken = window.getCookieRegex("CsrfToken");
	var CtxAuthId = window.getCookieRegex("CtxsAuthId");
	var ASPNET_SessionId = window.getCookieRegex("ASP.NET_SessionId");

	$.ajax({
		headers: {
			'Csrf-Token':CsrfToken,
			'CtxAuthId':CtxAuthId,
			'ASP.NET_SessionId':ASPNET_SessionId,
			'X-Citrix-IsUsingHTTPS': 'No'
		},
		type: "POST",
		url: usernameURL,
		dataType: "text",
		success: function (data) {
			CTXS.trace("getUsername data:" + data);
			$('#customTop').html(data);
		}
	});
};
go to the upper section of the file and locate or add if not exists CTXS.Extensions.afterDisplayHomeScreen = function (callback)
CTXS.Extensions.afterDisplayHomeScreen = function (callback) {
  getUsername();
};
style.css Modification
Open C:\inetpub\wwwroot\Citrix\StoreWeb\custom\style.css and add the following lines at the end of the file.
#customTop {
  text-align:right;
  color:gray;
  font-size:12px;
  padding-top:5px;
  padding-right:5px;
}
The field #customTop is related to the eG Component.

GEO Location
For public IP-Addresses, eG uses a local 3rd party maxmind database to match the IP-Address of the Endpoint to his location. For private IP-Addresses on the LAN/WAN Network you can define at your own.
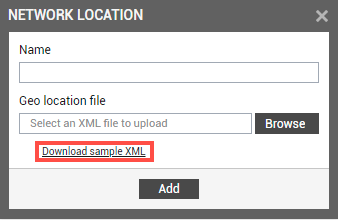
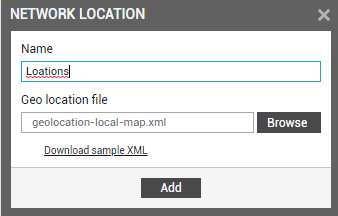
To manage the private IP-Addresses, eG Manager -> Agents > GEO Locations and click Configure Network Location

Click Add New Network Location

<config>
<!--
Here is the Out of the box setting for GEO Location details.
eG Support/Admin have to edit manually to get the desired
GEO location details using the below mentioned options.
-->
<location is-default="true">
<country>Unknown</country>
<region>Unknown</region>
<city>Unknown</city>
<country-code>NIL</country-code>
<latitude>0</latitude>
<longitude>0</longitude>
</location>
<!--
There are three different options available for mapping
a local (Intranet) IP address to geo location details.
-->
<!--
Option 1 :
The IP range is calculated based on the start ip and the end ip.
The below sample calculates IP rages from 192.168.8.1 to 192.168.8.246
If the User's IP address is within the range then the GEO Location
details will be considered as configured below.
-->
<location start-ip-address="192.168.8.1" end-ip-address="192.168.8.100">
<country>India</country>
<region>Tamil Nadu</region>
<city>Chennai</city>
<country-code>IN</country-code>
<latitude>13.0827</latitude>
<longitude>80.2707</longitude>
</location>
<location start-ip-address="192.168.8.101" end-ip-address="192.168.8.120">
<country>India</country>
<region>Maharashtra</region>
<city>Mumbai</city>
<country-code>IN</country-code>
<latitude>19.0760</latitude>
<longitude>72.8777</longitude>
</location>
<location start-ip-address="192.168.8.121" end-ip-address="192.168.8.140">
<country>India</country>
<region>West Bengal</region>
<city>Kolkata</city>
<country-code>IN</country-code>
<latitude>22.9868</latitude>
<longitude>87.8550</longitude>
</location>
<location start-ip-address="192.168.8.141" end-ip-address="192.168.8.150">
<country>United Kingdom</country>
<region>England</region>
<city>London</city>
<country-code>UK</country-code>
<latitude>51.5074</latitude>
<longitude>0.1278</longitude>
</location>
<location start-ip-address="192.168.8.171" end-ip-address="192.168.8.220">
<country>United States</country>
<region>California</region>
<city>Los Angeles</city>
<country-code>USA</country-code>
<latitude>34.0522</latitude>
<longitude>118.2437</longitude>
</location>
<location start-ip-address="192.168.8.221" end-ip-address="192.168.8.254">
<country>Singapore</country>
<region>North Region</region>
<city>Woodlands</city>
<country-code>SGP</country-code>
<latitude>1.3521</latitude>
<longitude>103.8198</longitude>
</location>
<location start-ip-address="192.168.11.1" end-ip-address="192.168.11.230">
<country>Australia</country>
<region>New South Wales</region>
<city>Sydney</city>
<country-code>AUS</country-code>
<latitude>33.8688</latitude>
<longitude>151.2093</longitude>
</location>
<location start-ip-address="192.168.11.231" end-ip-address="192.168.11.254">
<country>United States</country>
<region>New Jersey</region>
<city>Atlantic City</city>
<country-code>USA</country-code>
<latitude>38.56</latitude>
<longitude>73.54</longitude>
</location>
<location start-ip-address="192.168.9.1" end-ip-address="192.168.9.254">
<country>United States</country>
<region>California</region>
<city>San Francisco</city>
<country-code>USA</country-code>
<latitude>37.7749</latitude>
<longitude>122.4194</longitude>
</location>
<location start-ip-address="192.168.10.1" end-ip-address="192.168.10.254">
<country>United States</country>
<region>Colorado</region>
<city>Denver</city>
<country-code>USA</country-code>
<latitude>39.7392</latitude>
<longitude>104.9903</longitude>
</location>
<location start-ip-address="192.168.1.1" end-ip-address="192.168.1.254">
<country>Singapore</country>
<region>North-East Region</region>
<city>Seletar</city>
<country-code>SGP</country-code>
<latitude>1.2885</latitude>
<longitude>103.8565</longitude>
</location>
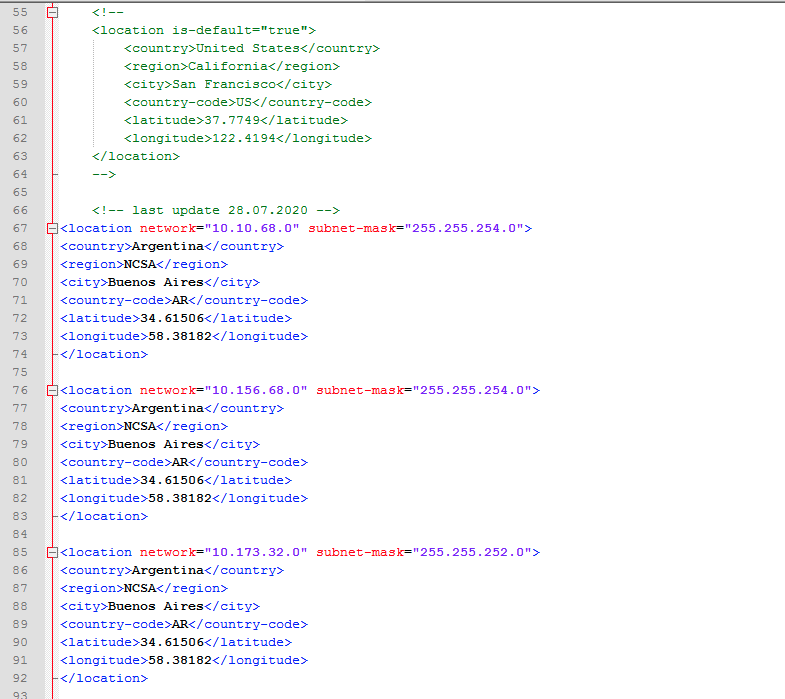
<!--
Option 2 :
The value against the network attribute is starting IP.
The IP range is calculated based on the start ip and the subnet-mask.
The below sample calculates IP rages from 192.168.10.1 to 192.168.11.254
If the User's IP address is within the range then the GEO Location
details will be considered as configured below.
-->
<!--
<location network="192.168.10.1" subnet-mask="255.255.254.0">
<country>United States</country>
<region>California</region>
<city>Los Angeles</city>
<country-code>US</country-code>
<latitude>34.0522</latitude>
<longitude>118.2437</longitude>
</location>
-->
<!--
Option : 3
If the User's IP address does not match with any of the above 2 options then
the default GEO Location details will be considered as configured below.
-->
<!--
<location is-default="true">
<country>United States</country>
<region>California</region>
<city>San Francisco</city>
<country-code>US</country-code>
<latitude>37.7749</latitude>
<longitude>122.4194</longitude>
</location>
-->
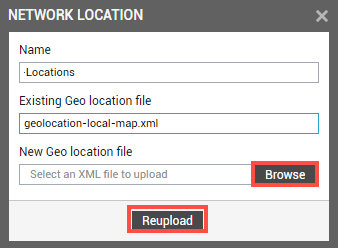
</config>Edit the XML File with the related Data of your private network locations
After you have add all required locations to the XML, it’s time to upload the Data to the eG Manager.

Updating Network Locations
In eG Manager the Cities, Country, Locations and Regions are listed as Unknown, this is the time to update the xml file with the unknown locations

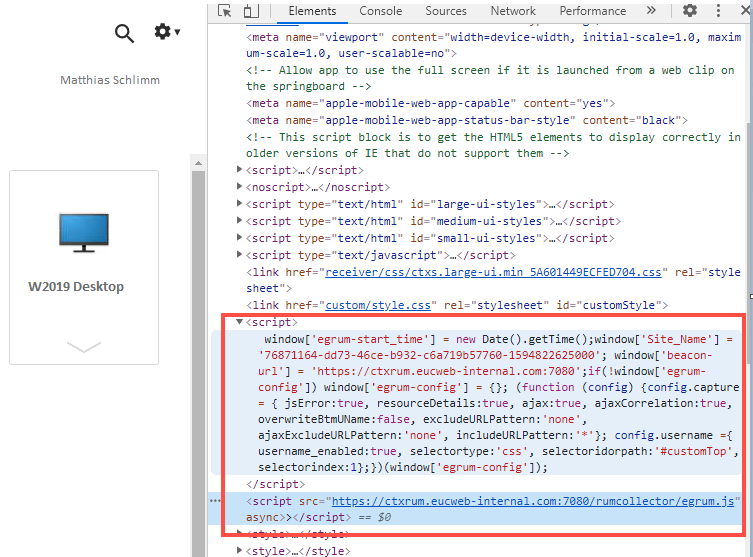
Check JavaScript injection
If all is setting up, login into Citrix StoreFront Webpage, open the developer tools and go to the head section and see the injection as follows. Great it looks like it works, after 5 minutes the Data are shown in the eG Manager.
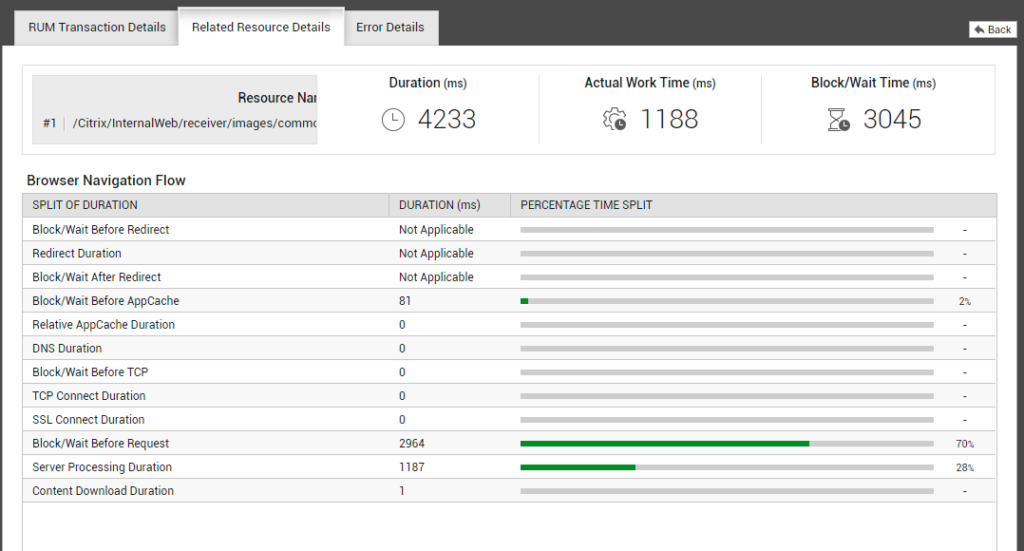
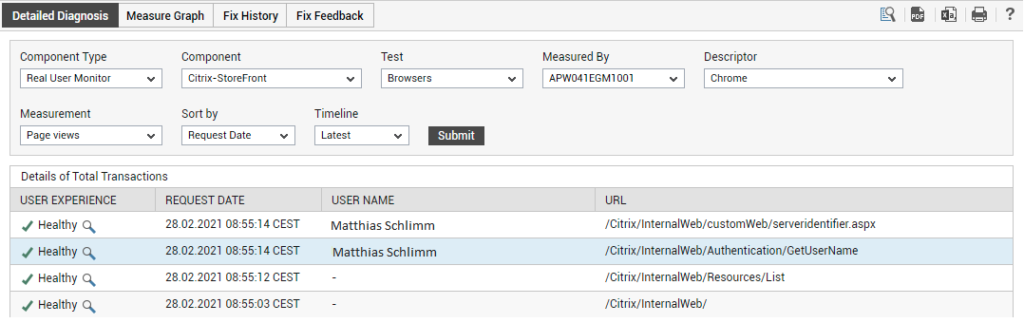
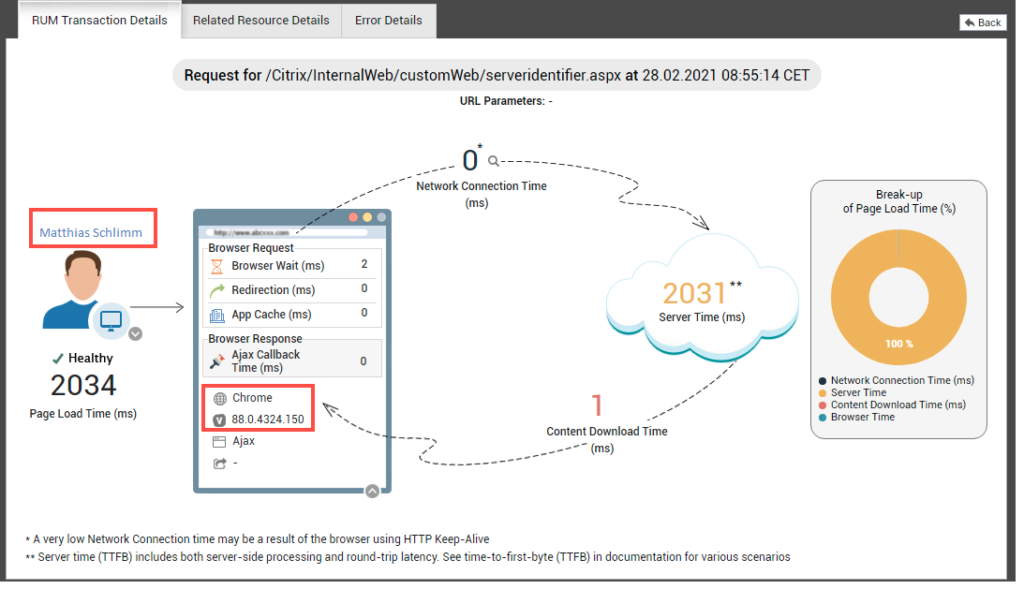
Real User Monitor in a practical scenario
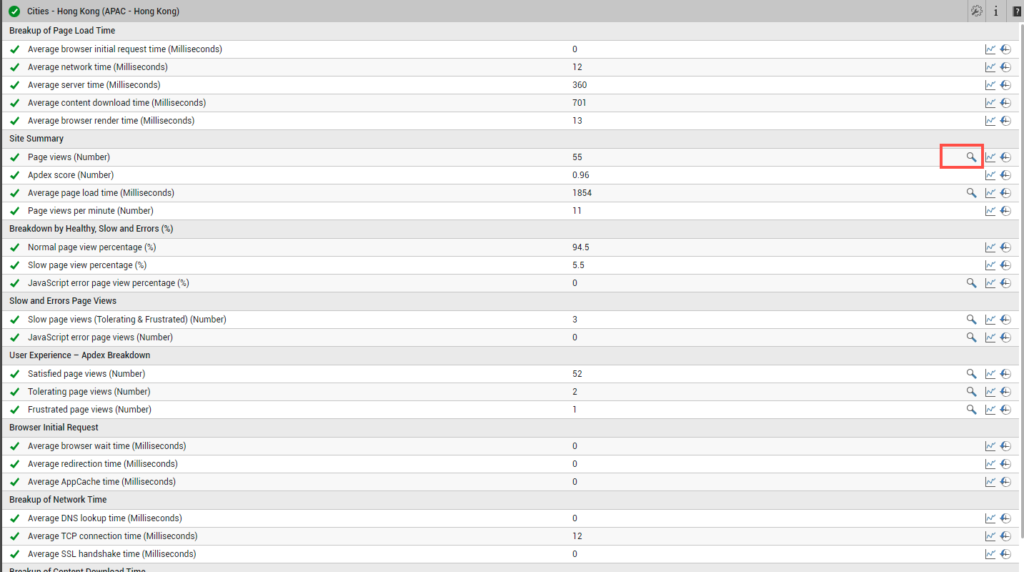
in eg Manager -> Monitor -> Real User Monitoring

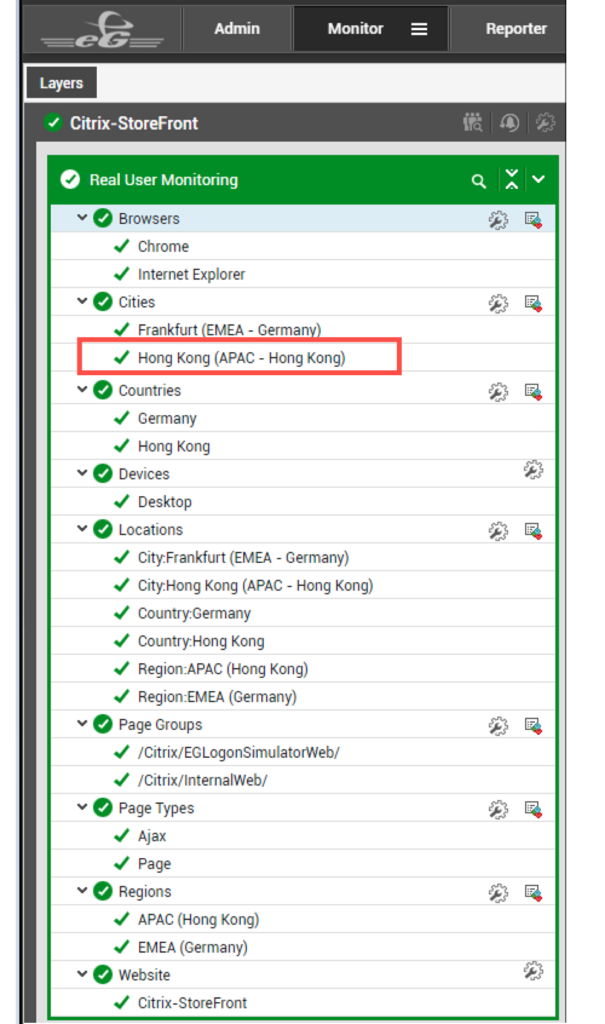
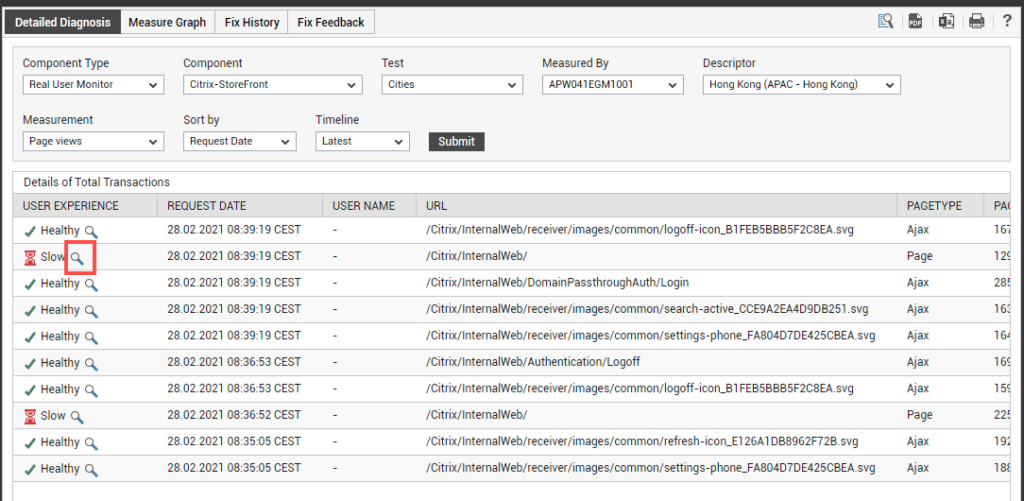
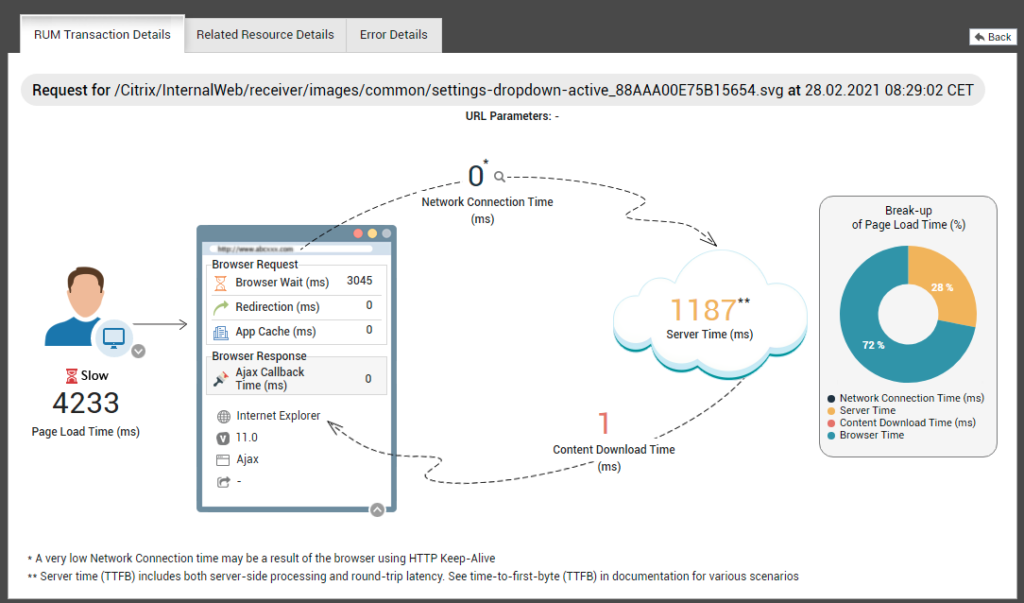
Click to a City and on the right side the Data are listed, click the Analyze Icon to get the insight data
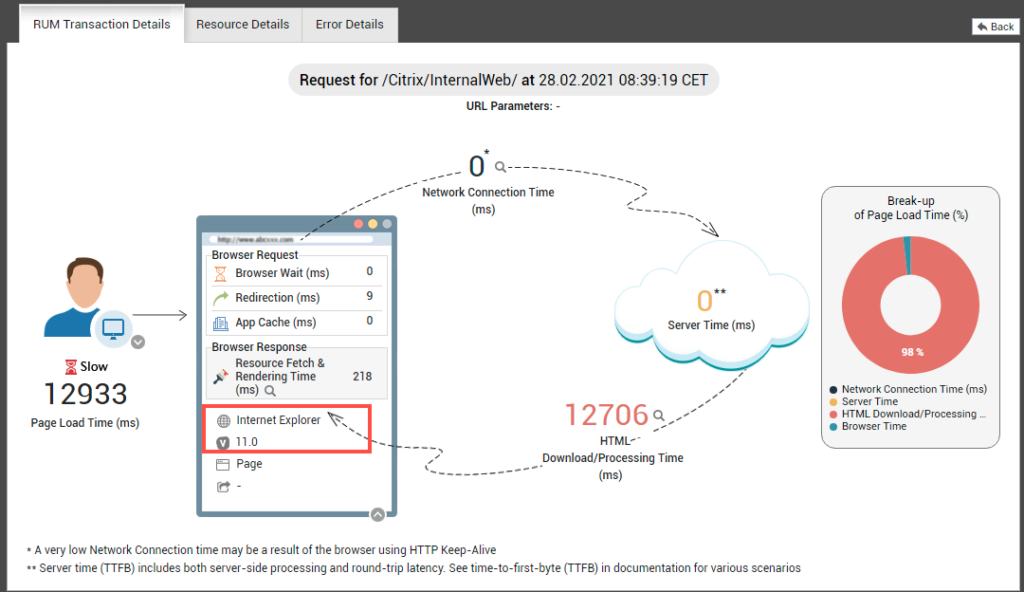
Capturing the Username is not possible with Internet Explorer, works better on Google Chrome & Edge.
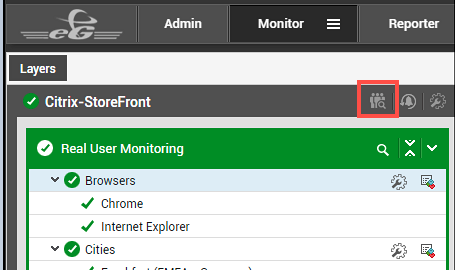
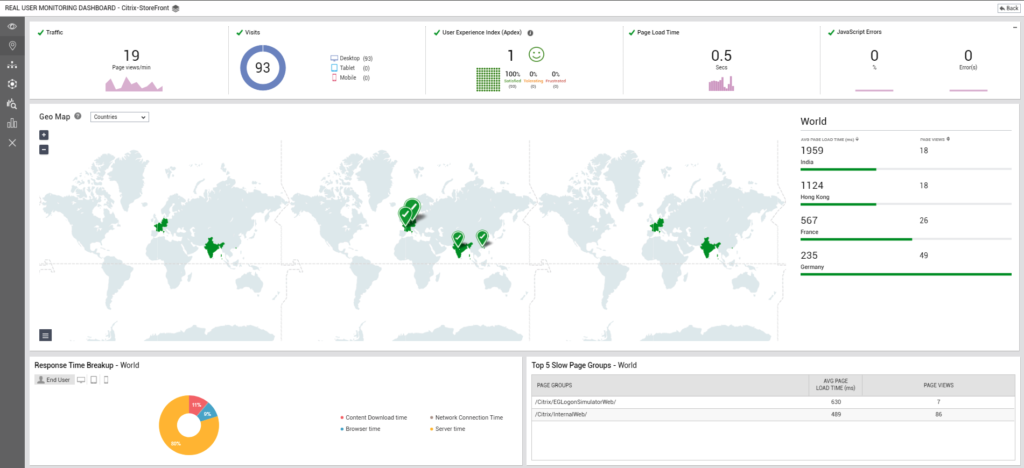
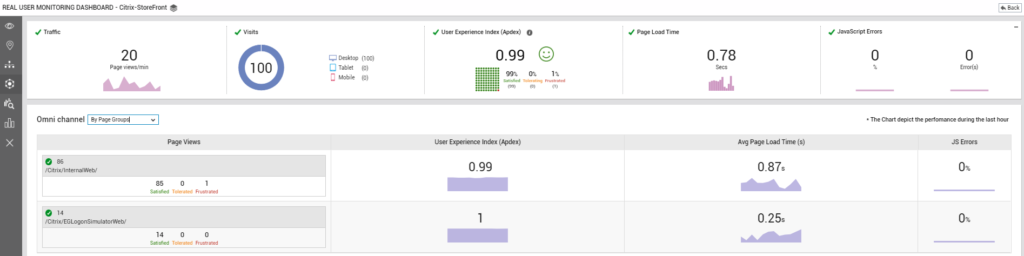
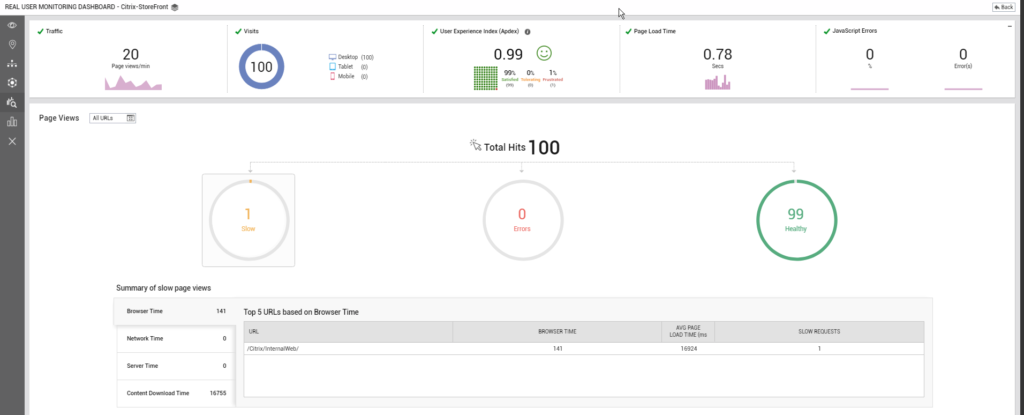
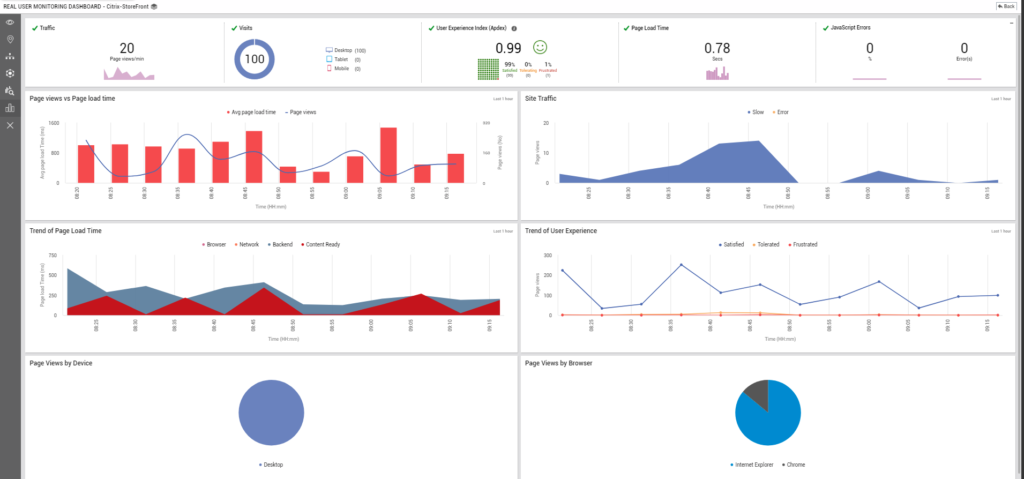
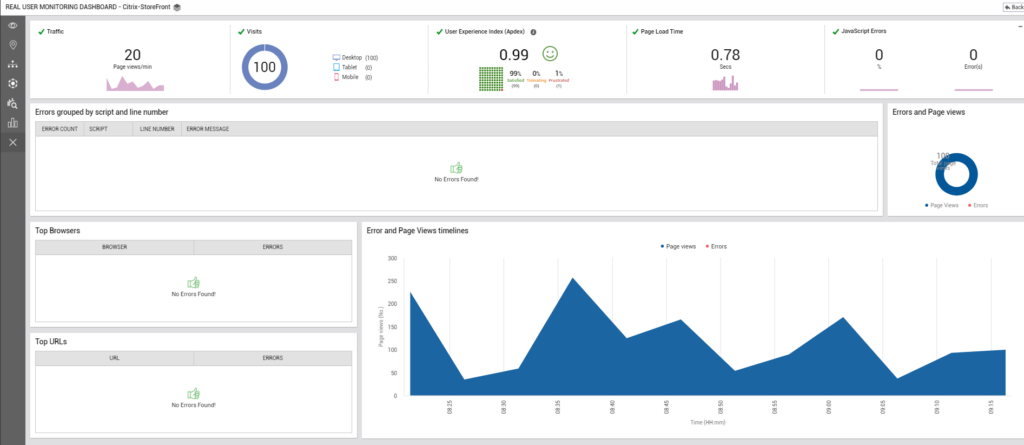
Real User Monitoring Dashboard
Jump in the Dashboard from the RUM Layer
Below you can find an overview of all RUM Dashboards available out of the Box


Conclusion
Real User Monitoring helps you a lot to identify issues and see where it come from in an easy way. User Experience is one of the biggest Challenges and is more to check if a service is available or not. From a GDPR prospective RUM transfers the Username, IP-Address of the Endpoint, Browser & Browser version.
Happy Monitoring and everytime a good User Experience
Related Links
https://www.eginnovations.com/docmentation/The-eG-Real-ser-Monitor/The-eG-Real-User-Monitor.htm